I love making chainmaille jewelry, and I love teaching it as well. Full caveat, I sell my own jump rings and kits, so I offer this free chainmaille tutorial to be able to point my customers and students to use as a reference. More tutorials will be forthcoming as my time allows.
The tutorial is geared toward a beginner (so if you’re not, please forgive the over-explanations!), but I do assume that the chainmailler knows how to open and close jump rings, flush tight and close (hmm… maybe that should be my next tutorial?)
Enjoy and if there’s any steps that aren’t clear, please please let me know so I can try to clarify them!
|
16g 6.0mm inner diameter
18g 4.0mm inner diameter
18g 3.0mm inner diameter (3.5mm in copper or jewelry brass)
Set aside your 18g 3.0 rings for now, you’ll only need them at the end, and only for the Celtic Visions Star pendant.
I usually do a little pre-closing of rings before I begin, but I don’t like to count out exactly how many, mostly because I’m usually wrong by the time we get to the end!
1. Start by pre-closing a little pile of 18g 4.0 rings. (or not! However you want to do it is fine, I don’t mean to presume! *grin*) |
 |
| 2. Open a 16g 6.0mm ring and add 2 closed 18g rings to it and close. |
 |
| 3. Open another 16g ring, and add 3 closed 18g rings. |
 |
|
Before you close it, run it through one of the 18g rings hanging off the other 16g ring. NOW close it.
|
 |
| You should have something that looks like this. |
 |
| 4. We’re going to repeat step 3 over and over until we have a chain that is FIVE 16g rings long. |
 |
|
5. Open a 16g ring, and thread it through the dangling 18g ring from the very first of the chain, and through the 1st dangling 18g ring of the second section of the chain.
The resulting ring configuration is kind of like an upside down triangle shape.
|
 |
|
Open another 16g ring and add it through the exact same rings as the first, so the 2 16g rings lay right on top of each other.
This is called "doubling" and it’s a useful technique that is used a lot in chainmaille.
|
 |
|
6. Now we’re going to repeat step 5 over and over, until we get to the end of the chain. Each new section of doubled 16g rings make the same upside down triangular shape as the first section.
Your chain should now have 5 big rings on the top, and 4 doubled big rings on the bottom. The last top row big ring has 2 little dangling rings on it.
|
 |
|
7. Now go back to the beginning of your chain.
Fold the TOP doubled 16g ring UP to lay on the FRONT of the chain, and fold the BOTTOM doubled 16g ring BACK to lay BEHIND the chain.
|
 |
 |
 |
 |
|
This is confusing, I know, but hopefully the pictures can clarify. See how one of the rings is on top of your chain, and the other is behind, like a little jump ring sandwich? That is what we want, a sandwich.
A tasty, tasty jump ring sandwich!
|
 |
|
8. If we just let go of the chain at this point, our doubled rings will just fall and we’ll be back at step 4. What we need to do now is secure these rings into place, and we do that by putting an 18g ring through each layer of the "sandwich". We are actually duplicating what the 18g rings on the bottom are doing — we’re doing the same thing for the top of the chain.
Open an 18g ring and weave it through the space at the top, just like the two on the bottom.
|
 |
|
As you feed the 18g ring through, make sure it goes through all three 16g rings — all the layers of the "sandwich" if you will. You also need to make sure that you don’t weave it through, or below the middle 18g ring.
|
 |
| 9. You have the top right side locked down securely, now you need to do the same thing for the left side on the top of your "sandwich". |
 |
 |
|
Take a moment to look carefully at this picture. Notice how the 18g rings all form what kind of looks like an "H" the two rings on the top are the top of the H. The horizontal ring in the middle is the middle of the H. And then the bottom 18g rings complete the lower half of the H.
If you pull a little bit on the ends of your chain, your "H" will look a little less H-like, the rings on top and on bottom will bend toward each other a bit, but that’s OK. I’m still going to refer to it as an "H" now and then!
|
 |
 |
|
10. Now you need to repeat steps 8 and 9 until you have folded up your doubled rings and locked them down into place all along the length of your chain.
As you complete each section, check that your "H" looks good. Make sure that you don’t feed any rings through that horizontal ring (the middle of the H) or accidently put a ring below or above where it shouldn’t be.
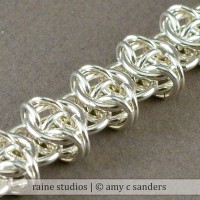
Guess what! If you’re going for a bracelet — you just keep repeating all these steps and you’re done! That’s all there is to it to Celtic Visions. Add sections on to the end of your chain until you arrive at your desired length. Add a clasp, and you’re all set!
If you want to make a Celtic Visions Star Pendant, then stay with me!
|
 |
| 11. At the end of your chain, you now have 2 18g rings dangling off. Add one more 18g ring to bring the grand total up to 3. |
 |
| 12. This part is tricky to explain, but bear with me. You want to thread a 16g ring through only the two OUTTER rings. So push the middle ring back a little bit, and thread a 16g ring through the outer rings only. It’ll be tricky, but you can do it! |
 |
| Once you have your 16g ring through, and closed, then double it with another 16g ring. |
 |
| 13. Now fold back each ring, kind of similar to the way you were folding back the rings previously in the chain. One comes on top of the chain, and the other folds back behind the chain. |
 |
 |
 |
|
After you have them folded back, push them outward, toward the end of the chain, and ease the two little rings back, until the two large rings are pushed all the way out.
Take care, because they will fall out of place easily. If you look carefully, we have half of our "H" there. The other half is missing, and will be added when we connect the chain together into a cicle/star.
|
 |
 |
| OK. Take a deep breath, go get a cup of coffee, make sure you’re nice and relaxed for this next tricky part. We’re almost through! |
 |
| 14. Add another 18g 4.0mm ring to the end of your chain — right onto the rings that we just folded back and have half of an "H". This ring is going to be the other half of the bottom of the H. |
 |
|
Notice the ends of your chain now. The end of your chain has the folded back DOUBLE rings with a 18g dangling ring, and the beginning of your chain has a SINGLE ring with no dangling rings.
We are going to pull the ends of the chain together now, and connect them. As you do this, make sure that the 18g dangling ring you added on the end of the chain stays in the INNER part of the circle, not the outer part.
We will be able to add a ring to the outer part later, but once we connect the circle, we’ll never be able to get a ring into that inner part, so that’s why this ring needs to stay on the inside of the circle.
|
 |
|
(DEEP BREATHS! CALM MEADOWS! EVERYTHING IS GOING TO BE ALL RIGHT!)
15. Take the beginning of your chain and open the 16g ring on the end. You don’t want anything to slide off this ring, so be careful, and don’t open it too much! (about 30 degrees is fine).
I’ve taken a blue sharpie to the open 16g ring to make it easier for you to see where that ring goes.
Bring the ends together,
(making sure that 18g ring is in the center/inner part of the circle)
(AND making sure nothing slides off that ring that we opened at the beginning of the chain)
thread your open 16g ring
IN BETWEEN the 2 doubled rings
through the dangling 18g ring — first on TOP of it, and then BEHIND it
and then THROUGH the middle 18g ring
and finally, after you’ve managed to weave that ring through all of that, make sure you come up IN BETWEEN the doubled rings again.
Once you manage all that — close. I like to turn my bent nose pliers backwards to make it easier to grab and close this ring.
Did you make it? YAY! GO YOU! The rest is easy peasy!
|
 |
 |
 |
 |
|
16. Take a look at your piece — can you see the missing part of the "H" ?? They are kind of squished up H’s now, but they are still there! Add a 18g 4.0mm ring through all the rings to finish off the H.
|
 |
 |
|
17. Now to add each "star" tip. Break open your 18g 3.0mm rings. Squish the top of each "H" together, and put a 18g 3.0mm ring through both. Repeat this for each of the 5 "H" rings.
(bye bye, blue sharpie-ed ring)
|
 |
 |
|
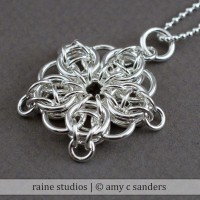
Look at that, you’ve made a Celtic Visions Star!! Add a jump ring to use as a bail to run your necklace chain through (your 18g 4.0mm rings work great for this) and you are all done.
Congrats!
|
 |


Hi Amy,
Well done! Very easy to understand. Well written and the photos relate well to your text. Next, please. 🙂
Hi Amy,
Your instructions appear to be very clear and concise. I can’t wait to make this pendant now! Thanks for your help and sharing!
Thanks Nell and Lynn! I appreciate it!
Excellent, went together very well. Please point me to you other free tutorials!
Thanks much for this wonderful tutorial!
wow…this is so beautiful. i’m gonna give it a try. thank you so much. 🙂
Hi Amy, Very nice and clear but one suggestion – can you put a picture of the finished item at the beginning of the tutorial so that we can see what we’re aiming to make. Just a thought……..
Alida
WOW! I remember you and I discussing the tutorial. It is so difficult to write them, but you did an excellent job. I would rather buy one that make one…pure laziness!!!
hope to see you again!!!
Linda